Sunday 30 November 2014

Own Photograph - Alex Nail Emulation


The purpose of this photograph is to capture the mist in the background while capturing the tree in the foreground. I used Alex Nail's work as a reference in order to try and emulate his work by changing the scene but incorporating the same style, capturing the mist. When capturing this photograph I decided to capture the sun behind the tree in order to highlight the mist in the background and overall I think this works well. The position of sun and the mist suggests that the photograph was taken early in the morning. Due to capturing the sun behind the tree this allows it to highlight parts of the tree and the mist as well as creating shadows within the photograph. The darkness of the foreground also allows the colour in the background to stand out and allow the parts it has highlighted to stand out. This also allows for contrast to appear within the photograph due to the dark foreground and the light background.The colour palette within this photograph is very limited due to the overall lighting. If more light was provided then the colour palette would be widened.


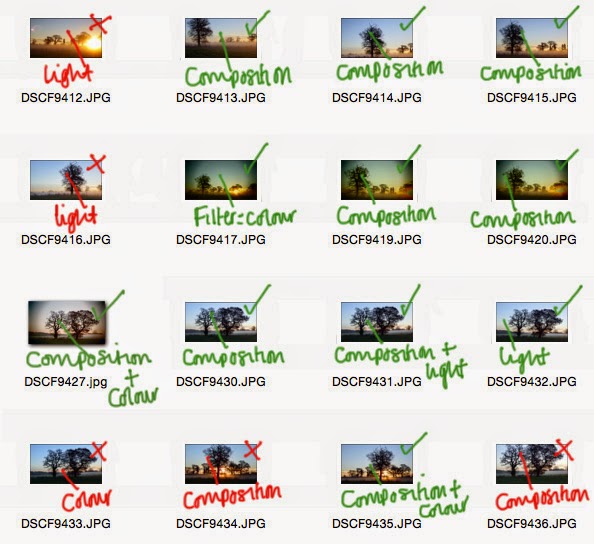
This shows the contact sheet with all the photos which were taken in order to achieve the final result. 

Alex Nail - Mist


Alex Nail is a landscape photographer who began photography in 2006 by capturing different photographs in Dartmoor. Alex travels to different location to capture new scenes and uses the light in their photographs to get the best outcome. As well as capturing photographs Alex also produces articles based on photography for magazines.

When researching Alex's work I noticed that some photographs they have captured includes mist and thought that this would be a good experiment to try out. Therefore I have used the images below as a reference when producing my own photographs and will consider the composition in which Alex has used. 


This photograph has a limited colour palette due as the only colours used are green, blue and white and this is due to the amount of natural light within the photograph. However the limited colour palette helps to capture the mist within the photograph and this is the aim of the photograph. The aim of this photograph is to capture the mist amongst the scenery. The mist gives a sense of movement due to the positioning of the mist as it is captured in different locations.


This photograph uses a restricted colour palette due to the photographer choosing to capture it in black and white. The aim of this photograph is to capture the mist which appears mainly in the background. Due to the amount of light this has produced soft tones  within the photograph and almost giving the photograph a painting appearance. Even though the photograph has a restricted colour palette there is a variety of tones used within the photograph. Lines are an important feature within this photograph as this helps give the photograph depth and also helps the mist to stand out as this is a prominent feature.

Own Photograph - Board


To capture this photograph the camera settings have been adjusted to advanced effects as this enables the dark edges to be created. The colour palette is very subtle and the colours are repeated constantly throughout the photograph this is mainly due to the subject matter. This photograph has also been taken during the early hours of the morning and the lightning provided helps to create shadows. The main focus of this photograph is to capture the board and the surrounding area. The board is the feature which is in focus the most whereas the background which contains the trees isn't in focus. This photograph also portrays the atmosphere within the area due to the space which suggests quietness and the movement of the water portrays stillness.


This shows the contact sheet for this photograph and indicates which photographs which will be used and which will not be used. The photograph with a * next to it indicates that this photograph will be used however it will need further editing in order for it to be suitable for this project. This is due to the lighting however once the exposure levels have been adjusted this shouldn't be a problem.

Monday 10 November 2014

Polar Panorama Effect


For this experiment I have used my own photographs then experiments with using the polar panorama effect. These photographs were produced by editing the original photographs in Photoshop in order to get the panorama effect which was simple to do and no editing to the photographs was done. The colour palette for this photograph is limited due to the surrounding area however the colours used make the stone arch stand out. The detail in the arch is also sharper as this effect shows the significance of the stone arch due to the size comparison. The lighter and darker tones of the photograph also help with the detail of the arch I also think it gives a different effect compared to a static image with no effects.


I feel that this photograph worked the best when experimenting with the polar panorama effect. The reason for this is probably due to the angle at which the photograph was taken, taken directly. When a photograph is taken at certain angle e.g. from the right it is more difficult for the photographs to match up together properly. I think due to the lack of colour and using HDR this also works well with using this experiment. Again in this photograph the stone arches are the most important features and I think the lightness of the sky helps to highlight this.

This photograph also worked relatively well when using this experiment due to the angle at which the photograph was taken. The foreground of this photograph is relatively bright compared to the background and I think this helps to highlight the foreground. The photograph itself is relatively dull due to the light and the brightness and because of this the detail within the photograph is reduced. The colour palette is also very limited as the colours are often repeated such as green and grey.


Saturday 8 November 2014

Panoramic Reference


By researching panorama photography this enabled me to further experiment and develop different photographs rather repeating techniques or using similar techniques. 


http://www.incrediblethings.com/art-design/a-new-spin-on-landscape-photography/.

To further experiment with photographs I started by looking at panoramic which will enable me to use my theme landscape.  This will involve taking landscape photographs and then transforming them into panoramas. The photograph shown above uses a range of subtle colours due to the photograph capturing a wide view of the location.


http://www.digitalcameraworld.com/2012/11/01/polar-panoramas-shoot-and-stitch-360-degree-pictures/3/

Again this is another example of a panorama photograph which has been created by taking and landscape photograph and then transforming this into a panorama. The colour palette is often repeated throughout the photograph and due to this it is very limited in terms of a variety of colour. The photograph itself is slightly distorted in the middle as it expands. Light has been captured within this photograph which can be found on the buildings which creates different tones.

Monday 3 November 2014

Filters


I started experimenting with filters as this gives different effects on the overall image as show in these photographs. The filters have given a darker feel to the photograph by changing the colour of the lightening such as the sky. The main focus of this photograph is to capture the arch and by trying to capture it in the centre. The colour palette used within the photograph is minimal and this is mainly due to using filters as this filters out the colour. However despite this I feel that it gives a dusky effect and overall works well due to the location of the photograph. The background isn't focused therefore this helps to show the importance of the arch and allows it to stand out from the background. 


This photograph has also used a filter which also gives the photograph as dusky effect. The composition of this photograph is poor due to the position it was taken at, which I think does impact the overall photograph in terms of framing. However the photograph was taken on a slope which also effects the composition. The photograph isn't as clear as it could be but I think the filter has impacted this.

Sunday 2 November 2014

Double Exposure


This photograph uses a range of different colours and tones which is mainly due to the double exposure effect has it captures multiple photographs. Due to the location I think that the double exposure works well as it provides the mist captures in one photograph to be placed behind the tree. The main focus of this photograph is the tree which is also more focused compared to the rest of the objects within the photographs. The aim of the experiment is to combine the photographs to create a different effect and with more content this is easily achieved. The photographs combined allow more mist to be included. Overall I think this photograph works the best out of the three images shown within the post. 


Double exposure has been used to create this photograph and overall it works well due to the objects combined. The colour palette is very subtle which is due to the photographs being combined as well as the location they were took. The tree is the most prominent object within the photograph due to the colour which contrasts with the arch and the tree being in the foreground. 


This photograph also used the same technique of combine two images together to create double exposure. Combining the two images allows the castle to be included within the photograph as well as including the tree and the scenery from the other photograph. The colour palette is very limited and the colours used are subdued due to the filters used one on of the photographs. The double exposure almost creates a silhouette of the tree and this helps to create different tones. The tones used allow the tree to be highlighted when overlapping the castle.